Decrypting HTTPS: How to Snoop on Your Own Requests
14 Aug 2020Agenda
This post will teach you how to see HTTPS in-action, but not every detail of how HTTPS works. Instead, you’ll gain a real life example to reference if you ever want to study the nitty gritty details.
To do this, we’ll learn how to snoop on our own HTTPS requests via Wireshark and witness as your computer establishes a secure connection.
Although the nitty gritty details of HTTPS are outside the scope of this post, we’ll review the basics before embarking on this exercise to provide a bit of context.
If you’re already familiar with the basics of HTTPS and TLS, feel free to skip to the next section.
The Basics
What is HTTPS?
HTTP stands for Hypertext Transfer Protocol. And at the very least, you likely know that whenever you see https:// in the address bar, the S in HTTPS stands for secure: ensuring that communication between your browser and the server is secure.
But how does HTTPS secure communication between you and the server? Your browser will perform a TLS handshake before sending any sensitive data.
What is a TLS Handshake?
At the beginning of any https:// request, your browser performs a TLS handshake: a protocol that ensures confidentiality, authentication, and integrity between your computer and the server it talks to.
Today, we’ll focus on confidentiality which promises to keep your data secret from snoopers by encrypting your request. To achieve confidentiality, your computer and the server perform a TLS handshake to negotiate the master secret used to derive keys that encrypt and decrypt messages sent between each other.
During this exercise, we’ll capture the “secret sauce” used to establish the master secret in order to decrypt our requests!
How to Snoop on Your Own Requests
Capture an Encrypted Request
Now that we understand the basics of HTTPS and TLS, let’s see it in-action. To do so, we’ll snoop on our own HTTPS request. First, let’s capture a plain ol’ HTTPS request without any clever tricks yet:
- Install the latest version of curl*
- Install and boot up Wireshark
- Type
curl https://github.comin the console (but don’t press enter yet!). - Start a capture via Wireshark
- Execute our
curlcommand - Stop the capture
*NOTE: Since v7.58.0, curl accepts a filename specified by the environment variable SSLKEYLOGFILE: this file logs secrets established during the TLS handshake. These logged secrets let us retroactively decrypt our HTTPS request in the next step– so be sure to install curl >= v7.58.0. Be aware that curl installations may contain varying TLS libraries, and only some libraries support it. For example, MacOS’ default curl installation uses Apple’s Secure Transport library which does not support this flag– so you may need to brew install curl-openssl and rewire your path to prefer it.
Now that we captured the request via Wireshark, let’s inspect the relevant packets:
- Type
tls.handshakein Wireshark filter bar and press enter - Locate packet labelled
Client Helloin theInfofield - Copy IP address from the packet’s
Destinationfield - Type
ip.dst == foobar || ip.src == foobarin Wireshark filter bar (wherefoobaris the IP address from previous step)*
*NOTE: Wireshark captures any and all network traffic which produces a lot of noise in our capture. To reduce noise, we filter packets exclusively to and from the server we just curl’d.
With our packets filtered, let’s take a peak at the Client Hello packet:
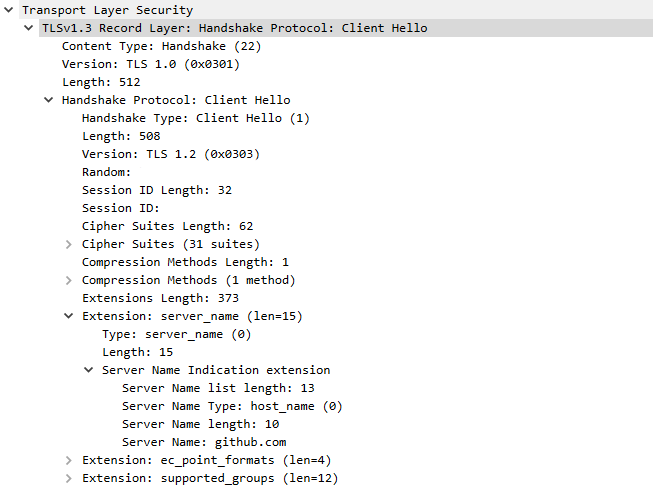
The contents of this Client Hello packet can be read clear as day.
This “Client Hello” packet is the first step of the TLS handshake. You may notice it’s readable while every packet afterwards is encrypted. Why?
One of the main selling points of HTTPS (and the underlying TLS handshake) is that it encrypts traffic so onlookers can’t snoop on data sent between your computer and the server. Unfortunately, that even includes you snooping on your own requests via Wireshark!
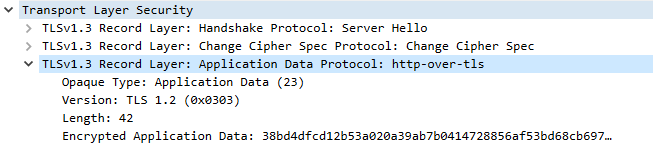
From this point on, TLS encrypts all data sent and received.
Perhaps you want to see the remaining traffic, decrypted and readable, for educational purposes. Hell, it’s your computer after all. This is indeed possible, and it’s only a quick 5 minute configuration away.
Capture a Decrypted Request
To do this, we must convince curl’s underlying TLS library to dump valuable secrets established during the handshake to decrypt the data. Repeat the initial steps from the Capture an Encrypted Request section but replace the curl https://github.com command with this:
Windows:
cmd /c "set SSLKEYLOGFILE=%HOMEPATH%\sslkeylog&& curl https://github.com"
Unix:
SSLKEYLOGFILE=~/sslkeylog curl https://github.com
NOTE: Notice we temporarily set SSLKEYLOGFILE for this one-off command. It’s not wise to set this variable permanently because someone could retroactively decrypt your traffic using this file. While you likely have bigger problems if someone has unauthorized access to your files, it’s best not to leave any trace regardless.
If you crack open that SSL key log file we just specified, you’ll see something like this:
SERVER_HANDSHAKE_TRAFFIC_SECRET 1234567890abcdefghijklmnopqrstuvwxyz...
EXPORTER_SECRET 1234567890abcdefghijklmnopqrstuvwxyz...
SERVER_TRAFFIC_SECRET_0 1234567890abcdefghijklmnopqrstuvwxyz...
CLIENT_HANDSHAKE_TRAFFIC_SECRET 1234567890abcdefghijklmnopqrstuvwxyz...
CLIENT_TRAFFIC_SECRET_0 1234567890abcdefghijklmnopqrstuvwxyz...
You can essentially think of this data as the “secret sauce” used to negotiate our secure connection: this is exactly what Wireshark needs to decrypt our request!
With Wireshark containing the capture of our last curl request, do the following:
- Go to Edit > Preferences > Protocols > TLS
- Click “Browse” next to (Pre)-Master-Secret log filename
- Select and confirm the
SSLKEYLOGFILElocation - Press “OK”
Now, let’s take a look at that previously encrypted packet:
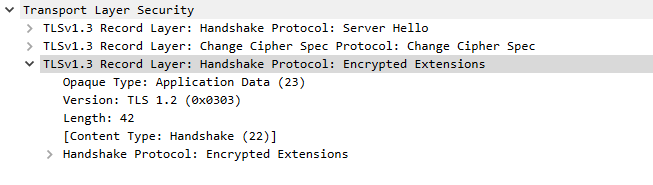
This previously encrypted packet is now decrypted and readable.
Voila! What was once labeled “Encrypted Application Data” is now readable– and we can see that this packet sent over additional TLS extension data.
Peaking even further in our capture, we can find the actual HTML response to our curl request!
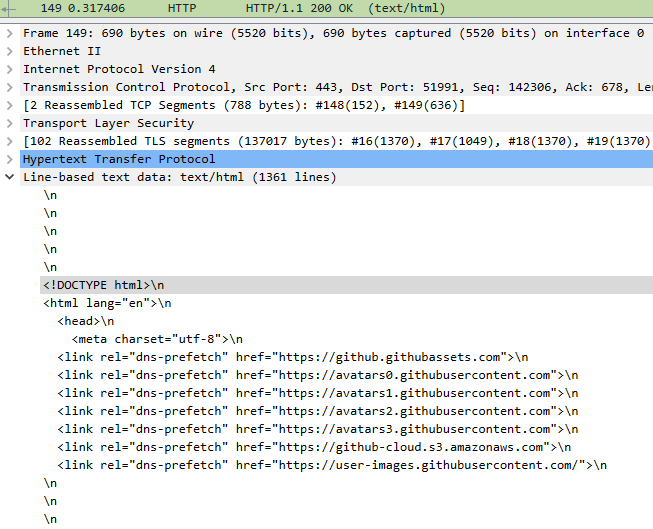
The HTML response to our curl request.
And there you have it. With this neat trick, you can capture and study the steps of the TLS handshake– or even just see the inner workings of an HTTPS request that your browser dev tools abstracts away from you.
Happy snooping! 🕵️
Appendix
curl vs. Browser
Why fire a request using curl instead of the browser? The simple answer is that curl produces less noise in your Wireshark capture.
When you request a URL via the browser, it scans the response and fires many more requests to fetch images, scripts, etc. defined in the HTML.
When you request a URL via curl, it fires a single request and returns the raw HTML: it does not subsequently request other resources defined in the HTML like your browser does.
Thus, the Wireshark capture is shorter and sweeter.
Wireshark vs. Browser Dev Tools
Why capture our request via Wireshark instead of just using our browser’s dev tools (which automatically decrypts the data for us)?
For 99.9% of web development, browser dev tools does the job because we mainly work on the level of HTTPS and above.
Though if you want to learn about the abstractions below HTTPS, Wireshark lets you see all the nitty gritty details that browser dev tools normally abstracts away from you– as it should, because it’s a lot of noise you often don’t need to worry about!